CPLD programming: Difference between revisions
No edit summary |
No edit summary |
||
| (4 intermediate revisions by the same user not shown) | |||
| Line 1: | Line 1: | ||
[[Category:ATW800/2]] | [[Category:ATW800/2]] | ||
(Re)Programming/flashing the CPLD (nicknamed "Absinth") should normally not be needed. | (Re)Programming/flashing the CPLD (nicknamed "Absinth") should normally not be needed. | ||
If there should a currently unknown bug which inhibits the ATW800/2 from working properly | If there should a currently unknown bug which inhibits the ATW800/2 from working properly or a new feature requiring a firmware change it might be necessary. | ||
The firmware is stored inside the flash memory build into the CPLD and requires special hardware, cable and software to reprogram it. | The firmware is stored inside the flash memory build into the CPLD and requires special hardware, cable and software to reprogram it.<br> | ||
Also, you'll need to solder a 2x5 pinrow onto your ATW800/2 which is located at the front right corner of the card, the bus connector facing towards you. It has a silk-screen print "JTAG". | |||
=== Hardware === | === Hardware === | ||
This hardware is called '''USB Blaster''' and was originally made by Altera (now Intel), the manufacturer of the CPLD used on the ATW800/2. | This hardware is called '''USB Blaster''' and was originally made by Altera (now Intel), the manufacturer of the CPLD used on the ATW800/2. This programmer is still available but quite costly for a hobbist and especially for a "one shot task" like updating a firmware once every 2 years. | ||
So quite soon the market was swamped with cheaper clones and even cheaper know-offs. To make things worse, the clones all ''look'' the same! You can't tell them apart from just a photo, you need to see the inside. | |||
==== The good ==== | ==== The good ==== | ||
As said, the original USB Blaster from Altera | As said, the original USB Blaster from Altera still available at Mouser and the like. Prepare for $/€250+. Even used ones are quite expensive still. | ||
[[File:BB orig.jpg|none|400px|This is what $250+ will get you: A 100% original.]] | |||
This original USB Blaster has a flex-cable attached to the case and ALTERA markings all over the place. | |||
==== The bad ==== | ==== The bad ==== | ||
Around 2005 the first clones appeared on the market. Initially they were 1:1 copies. Those obviously work fine but are hard to find now. Then they started to replace the original controller (EPM3032) with cheaper ones, which did the same job... somehow. YMMV. | Around 2005 the first clones appeared on the market. Initially they were 1:1 copies. Those obviously work fine but are hard to find now. Then they started to replace the original controller (EPM3032) with cheaper ones, which did the same job... somehow. YMMV. <br> | ||
All clones you can buy now do look more or less the same. | |||
[[File:BB clone.jpg|300px|The usual set you can buy on the internet these days]] | |||
With those clones, you usually get a ribbon cable (2x5 connectors) and and a Mini(!)-USB to USB-A cable to connect it to your PC. | |||
To make sure which version you're buying, you would need to open the case to have a look at the PCB inside. Here's my version (from ~2010) with works quite OK with the Altera tools: | |||
[[File:BB ok.jpg|none|400px|An early clone which works with Quartus]] | [[File:BB ok.jpg|none|400px|An early clone which works with Quartus]] | ||
You can spot 2 ICs and an oscillator. One IC is managing USB the other does the protocol handling with the CPLD/FPGA. But those are rare now. | |||
==== ...and the ulgy ==== | ==== ...and the ulgy ==== | ||
As of today, most USB Blasters offered on Amazon or AliExpress are clones of clones of clones. Most of them are reduced to a single | As of today, most USB Blasters offered on Amazon or AliExpress are clones of clones of clones. Most of them are reduced to a single WCH CH552G microcontroller which is a clone of an 8051 which was used in earlier clones. | ||
[[File:BB fake.jpg|none|400px|A current clone which will BSOD your Windows]] | [[File:BB fake.jpg|none|400px|A current clone which will BSOD your Windows]] | ||
This is a real one-chip-solution. They even spare the oscillator. And out of the box this will not work. Normally the will even give you a blue screen of death when you plug them into your Windows PC. They're a total rip-off... | |||
...but thanks to Rob Brown, who reversed those useless pieces of electronics, you can flash their firmware to actually make them working. [https://www.downtowndougbrown.com/2024/06/fixing-a-knockoff-altera-usb-blaster-that-never-worked/ Rob described all steps in depth on his webpage]. | |||
Of course the downside of this is: You need to do some nerdy things... | |||
In a nutshell you do this | |||
* Open the case | |||
* force the board into bootloader mode, short the "3V3" and "D+" pins on the internal header together while plugging it into USB | |||
* Run a python tool called [https://github.com/MarsTechHAN/ch552tool ch552tool] on your computer to upload the new firmware | |||
* which you got from [https://github.com/dougg3/CH55x-USB-Blaster/releases/download/v1.1.0/usb_blaster.bin here]. | |||
For the last 3 steps you have to act fast. The bootloader will time out fairly quickly. | |||
=== Software === | === Software === | ||
The CPLD is long time EOL and so is the software needed to program that thing. The software is still available for free but it does not play well with recent OS versions. The most recent supported Windows is version 10, the Linux version comes in a ''huge'' (4GB) VM image incl. the Linux kernel etc. which is IMHO a total overkill for just programming the CPLD. | |||
That said, we recommend using a (virtual) Windows XP, 7, 8 or 10 installation with the programming tool called Quartus Programmer provided in our public share, which is a comparably mere 122MB, located in "[https://nextcloud.geekdot.com/s/jt4fYYakAjMwXbp?path=%2FFirmware%2FCPLD_Absinth Firmware\CPLD_Absinth]". | |||
=== Prerequisites === | |||
Certain things have to be done before you can reprogram the Absinth CPLD. | |||
# Download the ''correct'' firmware file. There are firmware files for the Mega-ST and the VME cards. Additionally for the VME cards there are 2 variants, depending on the CPLD used: | |||
#* If your CPLD has a red dot marking, it's a EPM3128 - so choose the firmware file ending to "3128.pof" | |||
#* All other cards (Mega-ST & VME) need the file ending on "3064.pof" | |||
# Get an external 5V power supply (1 ampere is sufficient). | |||
# Remove your ATW800/2 from your ATARI | |||
# Remove installed TRAMs if your have some installed. | |||
# Solder a 2x5 pinrow onto the ATW800/2 where the silkscreen print says "JTAG" (close by the CPLD). | |||
# Make sure your USB Blaster is recognized by your system when plugged in | |||
# Attach your external power source to your ATW800/2 - Seurats "heartbeat LED" will start pulsing if everything was done right. | |||
#* A VME card can be supplied with power by using the unpopulated Mega-ST power connector (Silkscreen print "MST_PWR) | |||
#* Mega-ST cards can be powered through their soldered-on power cable - e.g. by using the running Mega-ST while the card itself is removed. | |||
=== Programming === | |||
After installing, start Quartus Programmer and it should greet you with this screen: | |||
[[File:Quartus Programmer.png|none|800px]] | |||
Take these steps to reprogram the ATW800/2 CPLD ("Absinth"): | |||
# Connect your USB Blaster cable to your ATW800/2 | |||
#* Pin 1 is marked on the cards silkscreen. Align this to the red marked cable of your USB Blaster flat-cable. | |||
# If everything is correctly configured it should be detected by Quartus Programmer and shown in its UI (1) - if not, click the "Hardware Setup" button and do a search there. | |||
# Click the "Auto Detect" button in Quartus Programmer (2), the name of used CPLD should be shown in the "Device" column (4) as well as in the diagram below. | |||
# Double-click into the "File" column (3) to select your previously downloaded firmware file to be programmed. | |||
# Make sure that the checkboxes for "Program/Configure" and "Verify" are checked (5). | |||
# Click the "Start" button to beginn programming. | |||
Programming takes just 1-2 seconds. When everything went fine, power down your external power-supply and then disconnect the USB Blaster from your ATW800/2. | |||
Latest revision as of 12:48, 27 June 2025
(Re)Programming/flashing the CPLD (nicknamed "Absinth") should normally not be needed. If there should a currently unknown bug which inhibits the ATW800/2 from working properly or a new feature requiring a firmware change it might be necessary.
The firmware is stored inside the flash memory build into the CPLD and requires special hardware, cable and software to reprogram it.
Also, you'll need to solder a 2x5 pinrow onto your ATW800/2 which is located at the front right corner of the card, the bus connector facing towards you. It has a silk-screen print "JTAG".
Hardware
This hardware is called USB Blaster and was originally made by Altera (now Intel), the manufacturer of the CPLD used on the ATW800/2. This programmer is still available but quite costly for a hobbist and especially for a "one shot task" like updating a firmware once every 2 years.
So quite soon the market was swamped with cheaper clones and even cheaper know-offs. To make things worse, the clones all look the same! You can't tell them apart from just a photo, you need to see the inside.
The good
As said, the original USB Blaster from Altera still available at Mouser and the like. Prepare for $/€250+. Even used ones are quite expensive still.
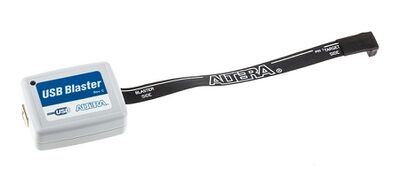
This original USB Blaster has a flex-cable attached to the case and ALTERA markings all over the place.
The bad
Around 2005 the first clones appeared on the market. Initially they were 1:1 copies. Those obviously work fine but are hard to find now. Then they started to replace the original controller (EPM3032) with cheaper ones, which did the same job... somehow. YMMV.
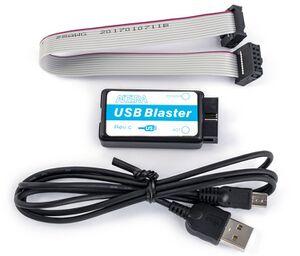
All clones you can buy now do look more or less the same.
With those clones, you usually get a ribbon cable (2x5 connectors) and and a Mini(!)-USB to USB-A cable to connect it to your PC.
To make sure which version you're buying, you would need to open the case to have a look at the PCB inside. Here's my version (from ~2010) with works quite OK with the Altera tools:
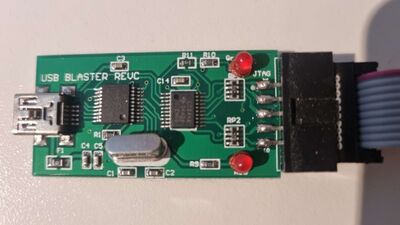
You can spot 2 ICs and an oscillator. One IC is managing USB the other does the protocol handling with the CPLD/FPGA. But those are rare now.
...and the ulgy
As of today, most USB Blasters offered on Amazon or AliExpress are clones of clones of clones. Most of them are reduced to a single WCH CH552G microcontroller which is a clone of an 8051 which was used in earlier clones.
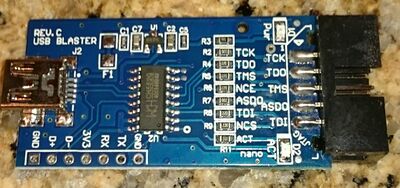
This is a real one-chip-solution. They even spare the oscillator. And out of the box this will not work. Normally the will even give you a blue screen of death when you plug them into your Windows PC. They're a total rip-off...
...but thanks to Rob Brown, who reversed those useless pieces of electronics, you can flash their firmware to actually make them working. Rob described all steps in depth on his webpage.
Of course the downside of this is: You need to do some nerdy things... In a nutshell you do this
- Open the case
- force the board into bootloader mode, short the "3V3" and "D+" pins on the internal header together while plugging it into USB
- Run a python tool called ch552tool on your computer to upload the new firmware
- which you got from here.
For the last 3 steps you have to act fast. The bootloader will time out fairly quickly.
Software
The CPLD is long time EOL and so is the software needed to program that thing. The software is still available for free but it does not play well with recent OS versions. The most recent supported Windows is version 10, the Linux version comes in a huge (4GB) VM image incl. the Linux kernel etc. which is IMHO a total overkill for just programming the CPLD.
That said, we recommend using a (virtual) Windows XP, 7, 8 or 10 installation with the programming tool called Quartus Programmer provided in our public share, which is a comparably mere 122MB, located in "Firmware\CPLD_Absinth".
Prerequisites
Certain things have to be done before you can reprogram the Absinth CPLD.
- Download the correct firmware file. There are firmware files for the Mega-ST and the VME cards. Additionally for the VME cards there are 2 variants, depending on the CPLD used:
- If your CPLD has a red dot marking, it's a EPM3128 - so choose the firmware file ending to "3128.pof"
- All other cards (Mega-ST & VME) need the file ending on "3064.pof"
- Get an external 5V power supply (1 ampere is sufficient).
- Remove your ATW800/2 from your ATARI
- Remove installed TRAMs if your have some installed.
- Solder a 2x5 pinrow onto the ATW800/2 where the silkscreen print says "JTAG" (close by the CPLD).
- Make sure your USB Blaster is recognized by your system when plugged in
- Attach your external power source to your ATW800/2 - Seurats "heartbeat LED" will start pulsing if everything was done right.
- A VME card can be supplied with power by using the unpopulated Mega-ST power connector (Silkscreen print "MST_PWR)
- Mega-ST cards can be powered through their soldered-on power cable - e.g. by using the running Mega-ST while the card itself is removed.
Programming
After installing, start Quartus Programmer and it should greet you with this screen:
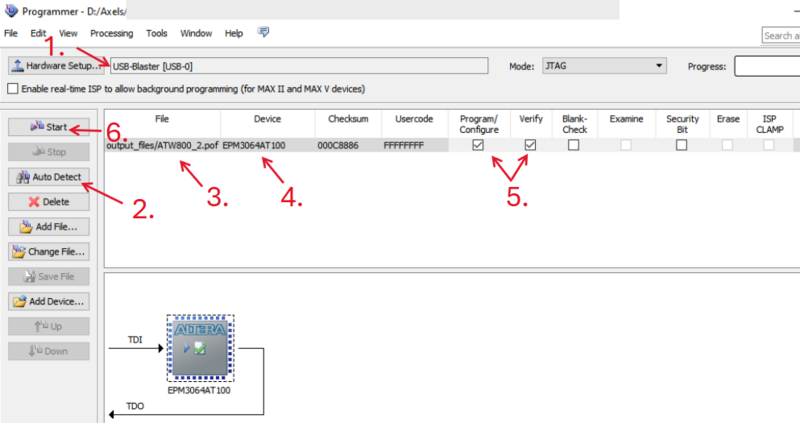
Take these steps to reprogram the ATW800/2 CPLD ("Absinth"):
- Connect your USB Blaster cable to your ATW800/2
- Pin 1 is marked on the cards silkscreen. Align this to the red marked cable of your USB Blaster flat-cable.
- If everything is correctly configured it should be detected by Quartus Programmer and shown in its UI (1) - if not, click the "Hardware Setup" button and do a search there.
- Click the "Auto Detect" button in Quartus Programmer (2), the name of used CPLD should be shown in the "Device" column (4) as well as in the diagram below.
- Double-click into the "File" column (3) to select your previously downloaded firmware file to be programmed.
- Make sure that the checkboxes for "Program/Configure" and "Verify" are checked (5).
- Click the "Start" button to beginn programming.
Programming takes just 1-2 seconds. When everything went fine, power down your external power-supply and then disconnect the USB Blaster from your ATW800/2.

